Spring, in March/April, is the best time to build a pond. This gives the pond the best chance to establish a biological balance. You can also do it in the fall, preferably September/October. The downside is that you can't plant the plants until the following spring.
Below is a step-by-step explanation of the preparations you need to make when constructing the pond. We've assumed a liner pond, but we'll also briefly consider a pre-formed pond.
Preparation: order of work
Consider all the work that needs to be done before construction can begin on the pond. For example, do trees need to be cleared or plants moved? Does part of the paving need to be removed? Do electrical cables need to be moved? Try to carry out the pond construction work in as logical an order as possible.
Preparation: earthmoving
Building a pond involves a lot of earthmoving. Sometimes the excavated soil can be incorporated into the garden itself, but usually this isn't possible and the soil must be removed. You can rent a skip for this. Keep in mind that excavated sand has a larger volume than sand in the ground, so you'll always be excavating more than the pond's volume.
For example: for a pond with a volume of five cubic meters, approximately seven cubic meters of soil must be removed. Rent the container well in advance and have it placed as close to the pond as possible.
The bottom of the excavated pond will soon be filled with white sand (10 centimeters). If necessary, pavement If extra white sand is also required, this can be ordered at once.
Only start digging the pond pit after thorough preparation. Consider the following:
- sequence of different activities
- removal of the sand
- checking the groundwater level
- laying out the pond shape in the ground
- weather forecast
Preparation: checking the groundwater level
To properly dig the pond, no groundwater must enter the hole. Therefore, measure the groundwater level before digging or request it (this can be done online for many locations). If the groundwater level is too high, you can keep the hole dry with a sewage pump or a wellpoint dewatering system. These pump systems are available for rent (Boels, Bo-Rent). The groundwater level is usually lower in autumn than in spring. In wet areas, this can be a reason to build the pond in autumn.
Preparation: place stakes
Using the drawing, you can mark the location and perimeter of the pond in the garden with stakes. Be very precise and double-check the measurements several times.
Preparation: check the weather forecast
Before you start digging, check the weather forecast. A little rain while digging isn't a problem, but downpours can flood the pond and damage the platforms installed in the pond.
Digging the pond pit
Then the moment finally arrives: the shovel goes into the ground. Dig out the pond platform by platform, again based on a drawing (the cross-section from the design).
An example:
Suppose the pond has three different depths: a shallow zone of 20 cm, a medium depth zone of 50 cm and a deep part of 80 cm.
Because you will be placing 10 cm of white sand on the bottom everywhere, you will have to dig out to a depth of 30, 60 and 90 cm.
Start by digging out the entire pond surface to a depth of 30 cm (yellow part on the drawing)
Once that's done, dig out everything except the shallow zone to a depth of 60cm (blue part)
Finally, dig out the remainder of the deep part to a depth of 90 cm (red part).
While digging, pay close attention to roots and other sharp protrusions. Remove all of these, especially from the sides of the pond. White sand won't protect them there.
Don't leave the pond hole exposed for too long after digging. The straight edges of your pond can easily crumble, especially after rain. This erosion is nearly impossible to repair.
Applying bottom protection to the pond
After digging the pond pit, you can begin applying the ground protection. A 10 cm layer of white sand is placed on all horizontal surfaces. This not only provides a soft and safe base for the liner but is also helpful in the event of high groundwater levels. If the pond liner is laid directly on clay soil, rising groundwater can push the liner upwards. The coarse white sand base distributes this pressure and directs the groundwater away to the sides.
Press the white sand firmly and finally cover it with a special protective blanket, available from shops where you can also buy plastic sheeting. Don't use old newspapers; they rot within a few weeks.
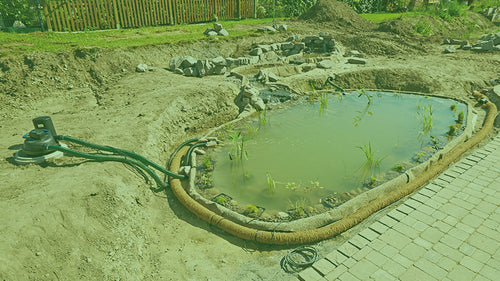
This photo clearly shows that the pond has been dug in a plateau-like shape. The plateau depths have been adjusted to accommodate the various aquatic plants that will be planted in the pond.
To protect the pond liner, a layer of white sand can be applied to the platforms. This not only prevents pond leakage but also helps drain groundwater to the sides of the pond.
A pond pit without a liner is very fragile. Rain can damage the platform, making it difficult to repair. Therefore, don't leave the pond pit open and exposed for too long.
After this the foil placed in the pond. The size of the liner can be calculated as follows:
- Length: maximum pond length + 2 x pond depth + 2 x 70 cm
- Width: maximum pond width + 2 x pond depth + 2 x 70 cm
Try the foil Press it as tightly as possible against the bottom and sides, walking on it as little as possible. Don't lay the liner too tightly: when the pond is filled, the pressure will push the sides and bottom slightly to the side and down.
As long as there is no water in the pond, all the folds in the corners look very unsightly, but as soon as the pond is filled, they are flattened and form nice hiding places for frogs and salamanders.
Once the foil is in place, you can trim it to size along the edge. Leave a foil edge of at least 50 cm. This can be buried later, when finishing the edge.
You'll usually have a fair amount of offcuts, unless you have a square pond. Large pieces of cut liner are ideal for placing on the pond floor or plateau as extra protection against leaks.
It's helpful to place a few concrete slabs here and there on the pond floor. You can stand on these while finishing the edge, or if you need to access the pond later for maintenance. Concrete slabs on the bottom are also handy for placing plant baskets.
The pond liner is placed in the pond pit. The liner edge will only be trimmed and buried later, when the pond's edge is finished.
Folds and creases in the pond liner are still very visible. Once the pond is filled, these will be flattened by the water pressure and become much less noticeable.
Preformed pond
If you've chosen a pre-formed pond, you'll proceed slightly differently. Try to dig out the pond's shape as accurately as possible, until the pond fits perfectly. Check that the top edge of the pond is perfectly level with a ruler and a spirit level.
You can now fill the space between the pond and the walls of the hole with a slurry of white sand. Mix the white sand with water until it forms a liquid, and fill in the gaps. Using a watering can or a gently running stream, work the sand all the way down to the bottom of the hole. Check constantly that the pond is still level.
More information about pond liner
Now the edging can be applied. You can read more about the different types of edging on the design page. Make sure the pond's edge is perfectly level. Check this regularly with a long ruler and a spirit level. This is especially important for a formal pond: a crooked edge is unsightly. With a natural pond, this is less noticeable, and you can more easily camouflage minor deviations later with marsh plants.
Here, the pond edge is finished with bricks. For any edge finishing , the edge of the pond must be perfectly level.
It is best to fill the pond when the edge finishing is finished. This has the advantage that you can still stand in the pond while finishing the edge. The photo doesn't provide a good example.
During edge finishing, the foil edge is trimmed or dug in.
Filling the pond
After the edge finish has been applied, the pond can be filled with tap water. Use the water meter to measure the water volume so you'll know the exact pond volume later. Tap water must be treated with GH-Extra immediately after filling to make it suitable for pond use. Most tap water in the Netherlands and Belgium is untreated and unsuitable for aquatic plant growth.
Your pond is now technically ready. You can now aquatic plants We're going to install it, but the real work still needs to begin: keeping the pond clear. The "start-up phase" page explains how to keep your new pond clear from the start.
Of course, you can also make it easy for yourself by installing a plastic pond trough We sell these in various shapes and sizes.

Sign up for our newsletter
Receive the best offers and personal advice.
cookie preferences
To provide you with better, more personalized service, we use cookies and similar technologies. We and third parties use cookies to track your browsing behavior on our website. More information can be found on our privacy policy page.
 Nederlands
 Deutsch